My window snapped, fell in the door, and wouldn’t roll up anymore. If thats you, you are about to get some help. Here is my step by step to replace your DRIVER side window regulator. Part number 72250-SCV-A02. Just for your reference, the PASSENGER side is 72210-SCV-A03. I got my part for $91.38 (driver side is more expensive) from a local Phoenix dealer. Bought it on the web, then picked it up via will call. Buying it on the web and then picking it up saved me about $40. If you buy it in person they charge $128. I bought it at http://www.hondapartsunlimited.com/
So I got the Window Regulator brought it home, and never took a picture of it. However, I did take one of the broken one when I removed it. If you see the springs sticking out, thats why its broken.

So here are my steps for replacing the Window Regulator
Step 1:
Remove the door cover. Start by removing the plate with tiny flat head, then remove 2 screws.

Step 2:
Remove plate with tiny flat head and take out 1 screw.

Step 3:
Remove speaker grill by pulling it out.

Step 4:
Remove 3 screws holding speaker in.

Step 5:
Pull speaker out and disconnect it by pinching white tab

Step 6:
Pull out inside door handle slightly

Step 7:
Remove linkage from interior door handle

Step 8:
Let door handle dangle. No need to disconnect it.

Step 9: THE HARDEST STEP
Remove 2 plastic triangles. The right one takes about 10 seconds (pry from the top down). This is the left most one, and it is by far the hardest thing I had to do in the whole replacement. It took me 30 minutes to get this off. All I can say is this, it needs to come towards you, then up, then diagonal up/right. You will bend this, I promise. I found my best bet was to use two screw drivers instead of one. Be patient, this will take time.

Look inside here to find the brass tab.

Step 10:
Everything is ready, prepare for the door cover to come off. I recommend putting something on the ground to balance the door cover on. Because when it comes off the wires will be connected, but the cover is to short to rest on the ground. I used a 40lb bag of salt.

Step 11:
Remove the door plastic. This is a link to the video, because I couldnt show it through pictures. Pretty easy to do. Remember to slide the door handle through the opening and leave it connected. Much easier.
http://www.byanwong.com/vidsbw/remove_plastic_honda_element.mpg
Step 12:
The door is still connected, lets look in between at the connections. You should see two of them.

Step 13:
Remove white connection blocks by pinching white tab. Shown below in video link.
Video: http://www.byanwong.com/wp-content/uploads/2017/04/Unplug-Power-Windows.mpg


Step 14:
Set hard plastic off to the side, and we start to remove the Window Regulator. This is what the door should look like prior to removal.

Step 15:
Unplug the Window Regulator. Its the blue cable behind the white plastic that should be attached to the door via an orange tab. Here is a picture of the cable connected, then disconnected, then broken from the orange tab. Extra photo.
Connected

Disconnected

Removed from orange tab (broken away). Remove the orange tab from wall.

Step 16:
Peel back the white plastic a bit by unplugging black tab out of top left corner, and peeling back from left to right. I didnt remove it, just peeled it back.
Pull out black tab, then peel.
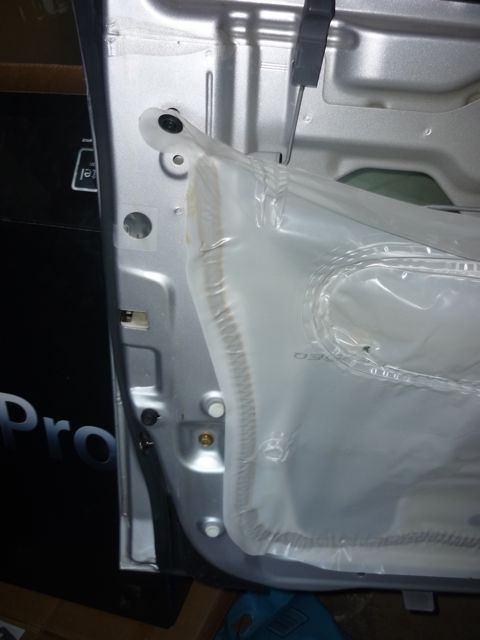
Result

Step 17:
Remove the 2 top bolts holding the Window Regulator in place (I still have one to go). Make sure the glass is up and secure. I used a couple of paint sponges and lodged them in between the window and the door to hold it up.

Step 18:
Remove the 2 bottom bolts holding the Window Regulator in place.

Step 19:
Loosen the final 3 bolts holding regulator (motor ??) in place. Reach your hand in the door once the bolts are loosened and grab the motor piece. Move the piece until the screws slide out.

Step 20:
Move the glass to the bottom of the door, and carefully remove the two bolts holding the glass in place.

Step 21:
Remove the glass from the car and set to the side. Getting the glass out is pretty easy, however be careful of scratching it on the way out.

Step 22:
Pull broken regulator out of door. Place new regulator in its spot. IMPORTANT: remember how the regulator was in the door (top, bottom, which direction its facing). Its easy to mess that up. But thankfully its tough to install it wrong because of the way the three screws from the motor part are arranged in the door. I am holding the regulator up as it will look inside the door.


Step 23:
When placing the new Window Regulator, it should have one bolt pre installed in the long arm. Look at this picture and see the right hand side of the linkage. You should see a silver bolt near it. That pre installed bolt should be slid into that exact hole. You will notice everything will line up perfectly. Next, put back in the missing bolt from step 17 and the 2 missing bolts from step 18 and tighten.
 Step 24:
Slide the glass back in the door and let go down until it lines up with these two holes. Once lined up, tighten the window.

Step 25:
Make sure the regulator is plugged in and the new orange tab is snapped into the wall.
Step 26:
Put everything back the way it was.
Step 27:
Say Fuck that noise, I didnt pay $300- $400 for this, I paid $91.

Step 28:
I tried to cover everything that I could in detail. If anyone has any questions, please ask me. I will come back through and try to clean up the incoherent sentences, as well as any content that isnt detailed enough. Please keep educating the common person with the tools you have at your finger tips. My hope is that the next thing I have to fix will already be documented on the net.
